Happy Belated Zhong Qio Jie (中秋節)

Even though it’s weeks past Zhong Qio Jie (中秋節) also known as the Mid-Autumn Festival, I still want to share these delicious date and red bean moon cakes that my Yi-Po Po and I made to celebrate one of my favorite Chinese holidays. Mid-Autumn Festival is a popular holiday celebrated by the Chinese and Vietnamese on the 15th day of the 8th month in the lunar calendar, this year it fell on September 12th. Traditionally, families and friends will gather and eat moon cakes, enjoy the beautiful bright full moon, and celebrate the bountiful harvest. Cities in China are decorated with floating sky lanterns, and the buildings and towers are also lit with lanterns and festive lights. There are huge festivals with Fire Dragon performances and parades of people carrying beautifully crafted lit lanterns.
To the Chinese, the full moon symbolizes family reunion which is why moon cakes are the official food of the Mid-Autumn festival. People eat moon cakes to show their homesickness, love for their family, hope for a bountiful harvest and a happy life. The traditional moon cake has a sweet cakey crust with a lotus seed paste filling and preserved salty egg yolk at the center. However, moon cakes vary in flavor and recipe in various parts of China. In terms of taste, they can be sweet, salty, spicy, or sweet and salty. Some common fillings are sweet red bean paste, sweet green bean paste, and taro paste. Finally, you have a choice between a sweet cakey crust, or a sweet flakey thin crust. There are just so many combinations of moon cakes to choose from, thankfully they are sold in Asian markets during the holiday so I usually I end up buying one of each of all the flavors.
One of my fondest memories as a kid growing up in Taiwan is going to the Mid-Autumn festival carrying my rabbit lantern to watch the fireworks and fire dragon performances, then staying up late and eating my Yi Po Po’s home made moon cake with the rest of the family. I have to admit that I’m not a huge fan of Chinese desserts especially the traditional moon cake, I find them too rich and densely packed with overly sweet fillings. However, my Yi Po Po’s dates and red bean paste moon cake with a sweet flaky thin crusts is the exception.
For years, I actually refused to learn how to make my Yi Po Po’s moon cakes because I wanted them to remain my once a year treat; it’s something that I looked forward to every year and only good if it’s made by my Yi Po Po. It’s not that I didn’t grow up watching her make hundreds of these or that I didn’t attempt to learn how to make them. It’s just that every time I TRY to make them they are never as good as the ones she makes. This year, I decided to give my Yi Po Po’s ever so delicious moon cakes another go.
First things first, Yi Po Po’s moon cakes are a labor of love. It’s time consuming but the end result is so worth the time and energy. What makes these moon cakes different from the traditional ones is that the crust is flakey much like a philo-dough, the filling is made with rehydrated red dates cooked down to the consistency of a preserve, added into the sweet red bean paste and shaped into small rounds the size of golf balls. It’s then wrapped with the dough, brushed with the egg wash and baked. The flakey crust adds a great contrasting texture and bite to the soft filling which is sweet from the red bean but also a little sour from the red dates. These bite size moon cakes are perfect for any time of the day as a breakfast item, mid day snack, or dessert.
Cheers & until next time,
Happy Zhong Qio Jie!

Date & Red Bean Moon Cakes
Serves 20
Ingredients
Filling
1 cup dried red dates
2 cups red bean paste, store bought
1 tbsp vegetable oil
Skin
2 cups All purpose flour
4 tbsp vegetable oil
8 tbsp water
½ tbsp sugar
⅓ tbsp salt
1 cup all purpose flour
4 tbsp vegetable oil
Egg Wash
1 egg yolk (beaten)
Method
For the Date and Red Bean Filling
1. In a small saucepan, put in dried red dates and cover with water. Bring the pot to a boil and simmer for 15 minutes until the dates are fully re-hydrated.
2. Drain the dates and let it fully cool. Once it’s cool enough to handle, peel the skin off of the dates and discard the pits. Reserve only the meaty part of the dates in a small bowl.
3. In a sauté pan, add 1 tbsp vegetable oil and turn the heat to medium. Add 2 cups of red bean paste and your reserved dates. Fold the dates into the red bean paste with a spatula and cook for 10 minutes, add water 1 tbsp at a time if it begins to thicken up too quickly. Once it is done cooking, reserve in a bowl and let cool.
4. Once it is cool enough to handle, roll into 20 round balls.
*This can be done a day in advance and kept in the refrigerator. Let the filling come up to room temperature before using.
For the Skin
1. Dough Ball A: In a large bowl, mix together the 2 cups all purpose flour, 4 tbsp oil, 1/2 tbsp sugar, 1/3 tbsp salt and 8 tbsp water. Knead briefly until it forms a smooth dough, roll into a long roll and cut into 20 pieces.
2. Dough Ball B: In a separate bowl, mix together 1 cup all purpose flour and 4 tbsp vegetable oil until it forms a smooth dough. Roll into a long roll and cut into 20 pieces.
3. Flatten Dough Ball A, place Dough Ball B in the center of Dough Ball A and wrap edges to enclose Dough Ball B, then lightly flatten. Using a rolling pin, roll out the dough to a 1/4 inch thick rectangle. Beginning at the top edge, roll up the rectangle to a thing, baton shape, turn the baton piece vertically and roll out to a 1/4 inch rectangle. Roll up one more time to form a square shape. Roll each piece of square skin into a ball and roll into a 2 inch circle. Repeat for all pieces.
Making the Moon Cakes
1. Preheat oven to 350 degrees Fahrenheit, and prepare an ungreased cookie sheet.
2. Place 1 ball of filling in the center of each dough circle and gather edges to completely enclose, press edges to seal. Lightly press down each piece with the palm of your hand to form a 2 inch circle and place each finished cake on the cookie sheet.
3. Brush the tops of the cakes with egg wash and bake for 20 minutes until dough is flaky; remove and serve.

![]()
Scallions are more than just a Garnish. You’ll be Surprised by these Delicious Scallion Bread Swirls!

There is something about cleaning out your refrigerator that is such a stress reliever, seeing a clean and almost empty fridge is just so calming. I always find that my fridge gets over loaded when we have company over, usually I’m left with a lot of garnishes and condiments. While cleaning out my fridge, I found 6 bunches of scallions hidden behind a mountain of tomatoes. I knew that they were going to start wilting soon and didn’t want them to go to waste, so I needed a recipe that would use a large amount of scallions… what to make… what to make… While I pondered that question, I looked up common ways of using scallions other than just sautéing them.
Scallions also known as green onions, or spring onions, they are commonly associated with Asian foods. They are milder than most onions, and can be used both fresh and in cooking. Chopped scallions can be sautéed in stir fries, braised in stews, used as garnish in soups and mixed into a filling for buns and breads.
The most common way of using scallions is to sauté them with another main ingredient to add more flavor. It’s not often the star of a dish, which is unfortunate because it has such great flavor on it’s own. One of my favorite dishes that showcase scallions is the Chinese scallion steamed buns. It’s essentially chopped scallions, rolled into little dough balls and steamed to airy perfection. So I thought, wouldn’t it be even better if they were baked into individual bread rolls.
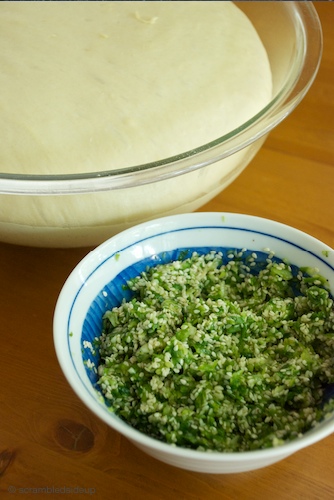
Luckily, I remembered that I recently found a Cilantro-Scallion Bread Recipe in the Summer Grilling Issue of Bon Appétit Magazine. I used this recipe as a foundation; I omitted the cilantro, doubled the amount of scallions and added toasted sesame seeds. These spiral swirls are super easy to make. Essentially after the first rise of the dough, you roll the dough into a large rectangle, spread the chopped scallion and toasted sesame seed mixture onto the dough, roll the dough into a cylinder, cut cylinder into 3/4″ dough swirls and bake for 30 minutes.

Scallion Bread
adapted Bon Appétit Magazine- July Grilling Issue
12 Serves
2 teasp active dry yeast
2 teasp kosher salt , divided
2 teasp sugar, divided
1 3/4 cups plus 3 tablespoons All purpose flour
4 tbsp unsalted butter, chilled, cubed
1 large egg plus 1 yolk
2 1/2 cups coarsely chopped scallions
3/4 cup sesame seeds
1 teasp freshly ground black pepper, to taste
3 tbsp olive oil plus more for bowl and brushing
1. Line a baking sheet with parchment paper or silo pad. Pour 1/2 cup warm water (105-115 degrees F) into a small bowl. Sprinkle yeast, 1 tsp. salt and 1 tsp. sugar over; let stand until mixture bubbles and doubles in size, about 10 minutes.
2. Place flour, butter, remaining 1 tsp. salt, and 1 tsp. sugar in a bowl of a stand mixer with dough hook attached. Rub in butter with fingertips until mixture resembles coarse meal. Beat in egg, yolk, and yeast mixture, scraping down the sides.
3. Knead on medium speed until dough is soft and smooth, about 5 minutes (do not over knead). The dough will still seem a bit soft. Form dough into a small ball; transfer to a large, lightly oiled bowl. Cover and let rise until doubled in size, about 90 minutes.
4. Meanwhile, in a food processor add the scallions and pulse until finely chopped. Transfer mixture to a medium bowl; stir in toasted sesame seeds, 1 tsp. freshly ground black pepper, and 3 Tbsp. oil and set aside.
5. Preheat oven to 350 degrees F. Roll dough into a 18×9 inch rectangle. Spoon scallion mixture onto the center and spread mixture evenly to the corners of dough.

6. Working from one short edge, roll dough rectangle into a cylinder.

7. Cut cylinder into 3/4″ dough swirls. Transfer dough swirls to prepared baking sheet; brush lightly with oil.

8. Bake until golden brown, about 30 minutes.
Printable Recipe

I think the swirl shape actually helps add layers of flavor and texture to the bread. While most of the chopped scallions are slowly baked and infused into the dough, there is a layer of scallions exposed at the top of the bread which is roasted and adds a crispy bite to the bread. The sesame seeds just takes it over the top, the nuttiness and crunch is perfect with the mildness of the scallions. It is incredibly fragrant right out of the oven, and it’s best served warm. You really don’t need anything else to go with this bread, it’s perfect on its own.
Cheers & until next time,
Happy August!

![]()
Spinach, Lemon Basil, Walnut Pesto

After a successful trip to Clark’s Elioak Farm Stand last week, I left with a variety of fresh herbs (lemon basil and regular basil being my summer favorites). I’ve mainly been adding the freshly chopped herbs to all my salads, pastas, and pizzas through out the week, but it seems as if my basket of basil is like the bottomless pan of lasagna in Garfield’s dreams (which I am totally not complaining about). I didn’t want the rest of the basil to go to waste, so I decided to make pesto which can be saved and used later as a dressing, marinade, sandwich spread, or sauce.
Traditionally pesto is made with pine nuts, basil, freshly grated cheese and oil. I didn’t have pine nuts or cheese but I did have a Costco sized bag of walnuts and spinach. I thought I would make do with what I had; I substituted the pine nuts with lightly toasted walnuts which added toasty/nutty flavor and the spinach gave it a thicker consistency and balanced out the heavy basil flavor. I used two kinds of basil, regular basil and lemon basil which added an extra kick of citrus to the sauce.
This pesto sauce will have a thicker consistency than the pesto sauce you see at your local grocery store or at wholefoods, where the oil separates from the herbs when you let it sit. The spinach soaks up most of the oil, and turns the sauce into more of a pesto paste. If you find that the sauce is a little too thick add a little lemon juice. You can most definitely use it as a pasta sauce, I actually find that the thicker consistency makes the pasta less oily. It’s also perfect substitute for tomato sauce on a pizza.
I decided to use it as a sandwich spread for a quick turkey and tomato sandwich for lunch and save the rest of it in a jar to use later in the week. I spread the pesto on two slices of bread, added a few slices of tomatoes and cold turkey sandwich meat and made it into a panini by putting it between a hot sandwich press. The pesto really brought out the sweetness of the tomatoes and tempered its acidity, and it gave the sandwich extra moistness since I had pretty dry turkey meat. I’ll admit I’m pretty stoked for the rest of my week now!!
Cheers & until next time,
Happy Mid-July!

Spinach, Lemon Basil, Walnut Pesto
adapted from Sunny Vegan
Makes 4 Cups
1 cup toasted walnuts
6 cups packed spinach (stems removed)
½ cup packed fresh lemon basil
2 cups packed fresh basil
2 cups olive oil
1 teasp chopped garlic
zest of 1 lemon
juice of 1 lemon
salt
pepper
1. Pulse walnuts and garlic in food processor.
2. Working in batches, add spinach and basil and blend together. Repeat until you have blended all the spinach and basil.
3. With the food processor on, slowly drizzle in olive oil and blend well. Add remaining ingredients and season with salt and pepper to taste.
*Note: To freeze for later use.
Pour into ice cube tray and freeze. Remove from ice tray and put into a zip lock bag, i can last up to 4 months.

![]()
Celebrating Opening Weekend of Clark’s Elioak Farm Stand with a few jars of Dill Pickles

One of the best things about living in the suburbs of Maryland is that we have access to a ton of local farmers’ markets from Washington D.C to Baltimore. And now that I have a car to haul my groceries, I no longer have to restrict myself to what I can lug back on the back of my bike going against traffic down a busy city street, although I do miss it from time to time.
I have to admit that my most hated season is summer in Maryland, the humidity and heat is sometimes just unbearable and I’m such a whiner about it too. But, what makes the July and August months survivable is when the Clark’s Elioak Farm Stand opens on the first weekend of July.
I try not to play favorites as to which market I purchase from regularly but Clark’s Elioak Farm in Ellicott City holds a special place in my heart. I spent much of my high school years hanging out on the farm, and have watched what started as a small petting farm grow into the Enchanted Forest and a well stocked farm stand that sells seasonal fruits and vegetables along with eggs, dairy and grass fed beef and lamb, and this year they even have a pick your own herbs and flowers field.
Since it was their opening weekend, I made sure to stop by and see what they had in stock. I was pleasantly surprised to find cantaloupe so fragrant that you can smell it from about a foot away), sweet corn from Eastern Maryland, an abundant amount of zucchini, bright yellow patty pan squash, cucumbers and many more. After an hour of mingling at the stand and trying out all their fresh herbs (lemon-basil being my new obsession), I left with 3 dozen ears of corn, 2 cantaloupes, a pound of cherries, 20 pickling cucumbers and a basket of herbs. I was concerned with what I would do with so many pickles, but my friend devised the brilliant idea that I make dill pickles and share them with her.
I’m pretty particular about pickles, I don’t really like it when they are super salty and they have to be cold and crispy. I like them with a bit of a kick, so along with the usual pickling spices of black peppercorn, coriander seeds, mustard seeds, celery seeds I added a bit of red chili pepper flakes and a few cloves of sliced garlic. They are the perfect condiment and side dish for any summer meal. You can eat them within 24-48 hours of pickling them and they last up to 2 weeks. So let’s get to pickling!

Dill Pickles
adapted from Blondie’s Cakes & Things
4 cups water
1 cup distilled white vinegar
2 tbsp kosher salt
1 teasp white sugar
6 pickling cucumbers cut into quarters
1 teasp black peppercorns
1/2 teasp coriander seeds
1/2 teasp mustard seeds
1 dried bay leaf (broken up)
1/4 teasp celery seeds (optional)
1/4 teasp red chili pepper flakes
8 medium cloves garlic, cut into long thin pieces
6 large sprigs of fresh dill
Equipment: 2 quart sized ball jars, or 1 large half liter jar (cleaned and dried)
1. In a non-reactive pot, bring water, vinegar, salt, and sugar to a boil. Remove from heat and let cool completely.
2. Place peppercorns, coriander seeds, mustard seeds, dried bay leaf, celery seeds, and red chili pepper flakes in the bottom of the jars.
3. Tightly pack in the cucumbers, squeeze garlic slices in between the cucumbers.
4. Carefully pour the cooled brine over your cucumbers, make sure they are covered completely (you should have a little over 4.5 cups of brine after boiling and cooling with a bit left over), place dill sprigs on the top of the jar before sealing very well.
5. Turn and shake jar until the pickling seasoning has evenly distributed throughout the brine. Place in refrigerator for at least 48 hours.

If you like your pickles on the saltier side, you can add a bit more salt to your brine. You can also omit the red chili pepper flakes and garlic if you aren’t a fan of the heat and garlicky flavor. This is a pretty basic recipe, so if you want to get crazy try out some other spices or flavors and add it to your brine. I think my next batch will have red peppers and white peppercorn instead of black peppercorn, we shall see!
Cheers & until next time happy pickling!
![]()
This post is also featured internationally here– http://tinyurl.com/6ebf2jc
Enjoying the Last of Spring with Roasted Asparagus

It’s always a little a sad to see Spring depart and have Summer roll in with vengeance. Spring a short season where we are blessed with a variety of fresh vegetables, such as peas, artichokes, spinach, fiddlehead ferns, spring onions, asparagus, and the list goes on.
Asparagus is one of my favorite vegetables, it’s such a versatile ingredient, it can be eaten raw, roasted, sauteed, steamed, pureed and made into a silky and creamy soup. One of the easiest preparations of asparagus is to roast it with a drizzle of olive oil, seasoned with sea salt and freshly ground black pepper. When roasted, you bring out the sweetness and earthiness of the asparagus. It’s tender and soft on the outside while still having a bite to it. It goes well with starches and proteins because has such a distinctive taste and adds a contrasting texture.
A few weeks ago as I was making my rounds through my local farmers market, I spotted some beautiful thin speared asparagus. Luckily, I was incredibly hungry and hadn’t eaten brunch prior to going out. I bought a few handfuls of asparagus and quickly returned home and threw them into the oven. I was pretty hungry and was in the mood for a hardy meal. I saw that I had some sweet potatoes laying around that I needed to use, so I decided to make some sweet potato hash browns to go with my asparagus. I didn’t stop there, as you know by now if you’ve been following my posts, I love a good fried egg with a runny yolk. So to top off my meal, I topped my sweet potato hash brown and roasted asparagus with a fried egg.
This is a fairly simple meal to prepare, it just takes a little bit of time but it was well worth it. The crispy sweet potato hash brown layered with the roasted asparagus worked really well together, and the runny yolk just added a luscious creamy texture to the dish. With every bite, you are left wanting more.
Roasted Asparagus and Sweet Potato Hash Brown topped with a Fried Egg
adapted from Once Upon a Plate
Serves 4
Roasted Asparagus
1 lb Asparagus, trimmed
1 tbsp olive oil
Sweet Potato Hash Brown
2 medium-size sweet potatoes, peeled and grated
1 1/2 tbsp rice flour
vegetable oil, for shallow-frying
Fried Eggs
4 large eggs
sea salt and cracked black pepper
For the Roasted Asparagus: Preheat the oven to 400 degrees. Arrange the asparagus on a single layer on a baking sheet lined with foil, drizzle olive oil over the spears and season with sea salt and freshly ground black pepper. Roast for 15-20 minutes until the asparagus are tender.

For the Sweet Potato Hash brown
1. Wash and peel the potatoes. Grate the potatoes into a bowl, then rinse thoroughly until the water in the bowl is clear, then let the potato sit in cold water for five to ten minutes. After, drain and dry the potato thoroughly, add and mix in the rice flour.
2. In a pan, heat 2-3 tablespoons of vegetable oil and add the potatoes. Season with sea salt and freshly ground black pepper to taste and cook on medium heat until your hash browns get nice and golden brown, 4-5 minutes. Once they are cooked through on one side, turn the heat up to medium-high and flip the hash browns and cook for another 5 minutes until brown and crispy.

For the Sunny Side Up Egg
1. Heat 1 tablespoon oil in a skillet over medium-high heat. Slowly pour the eggs into the pan and turn the heat down to medium, cover the pan and fry until whites are cooked though, 3-4 minutes.
Once everything is done, plate the sweet potato hash browns with 5-6 spears of roasted asparagus on top and cover with the fried egg.

![]()
 Good Morning… or afternoon?
Which ever it is, it's time for Brunch. Welcome to Scrambled Side Up, where I cook up a feast of my favorite brunch recipes.
Please feel free to read more
Good Morning… or afternoon?
Which ever it is, it's time for Brunch. Welcome to Scrambled Side Up, where I cook up a feast of my favorite brunch recipes.
Please feel free to read more  scrambledsideup27[at]gmail[dot].com